|
...making Linux just a little more fun! |
By Vinayak Hegde |
One of the biggest problems faced by a linux user is the problem of estimating and allocating enough disk space to partitions when setting up a linux box. It does not matter much whether he is a system administrator looking after a server farm or an intermediate/power user of linux who has realized that he is going to run out of disk space. Sounds familiar doesn't it? Then starts the struggle to overcome the problem. Aha, the user has a brain-wave and problem is solved (after some sleepless nights) by using some non-elegant methods (read dirty hacks) like symlinks spanning partitions or using some partition resizing tools like parted. But these are only generally temporary solutions and we are faced with the same problem again.
How you wish that this problem could be solved!! The hacker in you wishes that you had a system on which you can experiment freely regardless of disk space and you could add or delete disk space as and when required. If you are a system administrator of a site with a number of servers which are always connected to the Internet, the stakes are all the more higher. Each minute of downtime causes losses. Even the danger of customers going away from your site. You can ill afford to reboot the server after you make changes to the partition table every time this scenario arises. LVM can be a lifesaver in such situations.
The Linux LVM can make your life a little easier. LVM takes a higher level view of storage space as compared to that of partitions and hard disks. Read on to discover how. LVM was introduced into the main kernel source tree from 2.4.x series onwards. Before we move on to LVM, let us have a look at some of the concepts and terminology that will be used.
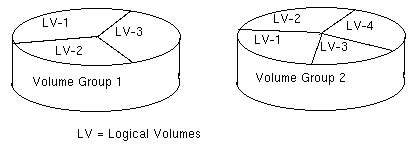
Now that we have got a grip on the terminology of LVM, let us see how it actually works. Each physical volume is divided into a number of basic units called as Physical Extents (PE) . The size of a physical extent is variable but same for physical volumes belonging to a volume group. Within one physical volume, every PE has a unique number. The PE is the smallest unit that can be addressed by a LVM on a physical storage.
Again each logical volume is divided into a number of basic addressable units called as Logical Extents (LE) . In the same volume group the size of the logical extent is same as that of the physical extent. Obviously, the size of LEs is same for all the logical volumes of a volume group.
Each PE has a unique number on a physical volume but not necessarily for a logical volume. This is because a logical volume can be made up of several physical volumes in which case the uniqueness of PE IDs is not possible. Hence the LE IDs are used for identifying the LE as well as the particular PE associated with it. As has been noted earlier there is 1:1 mapping between the LEs and PEs. Every time the storage area is accessed the address or the IDs of the LE is used to actually write the data onto the physical storage.
You might be wondering by now, where all the meta-data about the logical volume and volume groups is stored. As a analogy, the data about the partitions is stored in the partition table in non-LVM systems. The Volume Group Descriptor Area (VGDA) functions similar to the partition table for LVM. It is stored at the beginning at the beginning of each physical volume.
The VGDA consists of the following information :-
When the system boots the LVs and the VGs are activated and the VGDA is loaded into memory. The VGDA helps to identify where the LVs are actually stored. When the system wants to access the storage device, the mapping mechanism (constructed with the help of VGDA) is used to access the actual physical location to perform I/O operation.
Let us now see how to use LVM :-
Before we begin to install LVM there are some prerequisites:-
your kernel should have the LVM module configured.
	This can be done as follows:-
	# cd /usr/src/linux
	# make menuconfig

	under the Submenu:-
	Multi-device Support (RAID and LVM) -->

	enable the following two options:-
	[*] Multiple devices driver support (RAID and LVM)
and
	<*> Logical volume manager (LVM) Support.
This can be done using the following command:-
# df -h
Filesystem            	Size  	 Used   Avail  	Use% 	Mounted on
/dev/hda1		3.1G     2.7G	398M	87%	/
/dev/hda2		4.0G	 3.2G	806M	80%	/home
/dev/hda5		2.1G	 1.0G	1.1G	48%	/var
Use fdisk or any other partition utility to create the LVM partitions. The partition type of linux LVM is 8e.
# fdisk /dev/hda
 press 	p (to print the partition table)
 and 	n (to create a new partition)
After the creation of the Linux LVM partition. Print the partition table. It will look something like this:-
 Device Boot      Start       End    Blocks   Id   System
/dev/hda1   *         1       506   4064413+  83  Linux
/dev/hda2           507       523    136552+   5  Extended
/dev/hda5           507       523    136521   82  Linux swap
/dev/hda6 	    524       778   2048256   8e  Linux LVM
/dev/hda7           779      1033   2048256   8e  Linux LVM
# pvcreate /dev/hda6
pvcreate -- -physical volume "/dev/hda6" successfully created

# pvcreate /dev/hda7
pvcreate- -- physical volume "/dev/hda7" successfully created
The above command creates a volume group descriptor at the start of the partition.
Create a new volume group and add the two physical volumes to it in the following way.
# vgcreate test_lvm /dev/hda6 /dev/hda7
vgcreate- -- INFO: using default physical extent size 4 MB
vgcreate- -- INFO: maximum logical volume size is 255.99 Gigabyte
vgcreate- -- doing automatic backup of volume group "test_lvm"
vgcreate- -- volume group "test_lvm" successfully created and activated
This will create a volume group named test_lvm containing the physical volumes /dev/hda6 and /dev/hda7. We can also specify the extent size with this command if the extent size of 4MB is not suitable for our purpose.
# vgchange -ay test_lvm
# vgdisplay
--- Volume group ---
VG Name test_lvm
VG Access read/write
VG Status available/resizable
VG # 0
MAX LV 256
Cur LV 1
Open LV 0
MAX LV Size 255.99 GB
Max PV 256
Cur PV 2
Act PV 2
VG Size 3.91 GB
PE Size 4 MB
Total PE 1000
Alloc PE / Size 256 / 1 GB
Free PE / Size 744 / 2.91 GB
VG UUID T34zIt-HDPs-uo6r-cBDT-UjEq-EEPB-GF435E
# lvcreate -L2G -nlogvol1 test_lvm
Now you need to build a filesystem on this logical volume. We have chosen to make the reiserfs journalling filesystem on the logical volume.
# mkreiserfs /dev/test_lvm/logvol1Mount the newly created filesystem using the mount command.
# mount -t reiserfs /dev/test_lvm/logvol1 /mnt/lv1
Add the following entry to /etc/fstab so that the filesystem is mounted at boot.
/dev/test_lvm/logvol1 /mnt/lv1 reiserfs defaults 1 1copy the recompiled kernel if you have not replaced your original kernel with it yet so u have the option of using LVM or not using it.
  image   = /boot/lvm_kernel_image
  label   = linux-lvm
  root    = /dev/hda1
  initrd  = /boot/init_image
  ramdisk = 8192
After adding the above lines reinstall lilo by using
# /sbin/lilo
# lvextend -L+1G /dev/test_lvm/logvol1
lvextend -- extending logical volume "/dev/test_lvm/logvol1" to 3GB
lvextend -- doing automatic backup of volume group "test_lvm"
lvextend -- logical volume "/dev/test_lvm/logvol1" successfully extended
Similarly logical volumes can be reduced by using the following command
# lvreduce -L-1G /dev/test_lvm/lv1
lvreduce -- -Warning: reducing active logical volume to 2GB
lvreduce- -- This may destroy your data (filesystem etc.)
lvreduce -- -do you really want to reduce "/dev/test_lvm/lv1"? [y/n]: y
lvreduce- -- doing automatic backup of volume group "test_lvm"
lvreduce- -- logical volume "/dev/test_lvm/lv1" successfully reduced
As we can see from the above discussion LVM is quite extensible and pretty straightforward to use. After the volume groups have been set up. It is pretty easy to resize logical volumes as per requirements.